
我们会从如何调用到执行,整个流程做代码分析:
在游戏开发的时候,我们一般有这样的需求,对我们的代码进行测试。实际上UE4已经有这样的功能了,这样的功能可以参考官网,我这里就不再讲解。
而我现在讲解的是,关于UE4测刷化工具的整体框架分析。
如果我们想做单元测刷 需要将这些内容放在

我们的文件命名规则就是
源文件.spec.cpp
好,现在我们来看看它的框架。我们先举个例子:
BEGIN_DEFINE_SPEC(HelloSpec, "HelloGame.HelloSpec", EAutomationTestFlags::ProductFilter | EAutomationTestFlags::ApplicationContextMask)
TSharedPtr<FAutoGameManage> CustomClass;
FString RunOrder;
END_DEFINE_SPEC(HelloSpec)
void HelloSpec::Define()
{
	//CustomClass = FAutoGameManage::Get();
	////@todo 在此处写下我的期望
	Describe(TEXT("Execute()"), [this]()
		{
			BeforeEach([this]()
			{
				RunOrder = TEXT("A");
			});

			It(TEXT("should return true when successful"), [this]()
			{
				TestTrue(TEXT("Execute"), CustomClass->Execute());
			});

			It(TEXT("should return false when unsuccessful"), [this]()
			{
				TestFalse(TEXT("Execute"), CustomClass->Execute());
			});

			It("will run code before each spec in the Describe and after each spec in the Describe", [this]()
			{
				TestEqual("RunOrder", RunOrder, TEXT("A"));
			});

			AfterEach([this]()
			{
				RunOrder += TEXT("Z");
				TestEqual("RunOrder", RunOrder, TEXT("AZ"));
			});
		});
}
这个用法比较常见,宏的本质就是宏替换,现在我们把这个代码进行拆解,可以看看,它具体可以拆成什么样的代码?
class HelloSpec : public FAutomationSpecBase
{
public:
	HelloSpec(const FString& InName)
	: FAutomationSpecBase(InName, false)
	{
		static_assert((EAutomationTestFlags::ProductFilter | EAutomationTestFlags::ApplicationContextMask)&EAutomationTestFlags::ApplicationContextMask, "AutomationTest has no application flag.  It shouldn't run.  See AutomationTest.h.");
		static_assert((((EAutomationTestFlags::ProductFilter | EAutomationTestFlags::ApplicationContextMask)&EAutomationTestFlags::FilterMask) == EAutomationTestFlags::SmokeFilter) ||
			(((EAutomationTestFlags::ProductFilter | EAutomationTestFlags::ApplicationContextMask)&EAutomationTestFlags::FilterMask) == EAutomationTestFlags::EngineFilter) ||
			(((EAutomationTestFlags::ProductFilter | EAutomationTestFlags::ApplicationContextMask)&EAutomationTestFlags::FilterMask) == EAutomationTestFlags::ProductFilter) ||
			(((EAutomationTestFlags::ProductFilter | EAutomationTestFlags::ApplicationContextMask)&EAutomationTestFlags::FilterMask) == EAutomationTestFlags::PerfFilter) ||
			(((EAutomationTestFlags::ProductFilter | EAutomationTestFlags::ApplicationContextMask)&EAutomationTestFlags::FilterMask) == EAutomationTestFlags::StressFilter) ||
			(((EAutomationTestFlags::ProductFilter | EAutomationTestFlags::ApplicationContextMask)&EAutomationTestFlags::FilterMask) == EAutomationTestFlags::NegativeFilter),
			"All AutomationTests must have exactly 1 filter type specified.  See AutomationTest.h.");
	}

	virtual uint32 GetTestFlags() const override { return  EAutomationTestFlags::ProductFilter | EAutomationTestFlags::ApplicationContextMask; }
	using FAutomationSpecBase::GetTestSourceFileName;
	virtual FString GetTestSourceFileName() const override { return __FILE__; }
	using FAutomationSpecBase::GetTestSourceFileLine;
	virtual int32 GetTestSourceFileLine() const override { return __LINE__; }
protected:
		virtual FString GetBeautifiedTestName() const override { return "HelloGame.HelloSpec"; }
		virtual void Define() override;

	TSharedPtr<FAutoGameManage> CustomClass;
	FString RunOrder;
};

namespace
{
	HelloSpec HelloSpecAutomationSpecInstance(TEXT("HelloSpec"));
}

void HelloSpec::Define()
{
	//CustomClass = FAutoGameManage::Get();
	////@todo 在此处写下我的期望
	Describe(TEXT("Execute()"), [this]()
	{
		BeforeEach([this]()
		{
			RunOrder = TEXT("A");
		});

		It(TEXT("should return true when successful"), [this]()
		{
			TestTrue(TEXT("Execute"), CustomClass->Execute());
		});

		It(TEXT("should return false when unsuccessful"), [this]()
		{
			TestFalse(TEXT("Execute"), CustomClass->Execute());
		});

		It("will run code before each spec in the Describe and after each spec in the Describe", [this]()
		{
			TestEqual("RunOrder", RunOrder, TEXT("A"));
		});

		AfterEach([this]()
		{
			RunOrder += TEXT("Z");
			TestEqual("RunOrder", RunOrder, TEXT("AZ"));
		});
	});
}
我们已经将它编译成功

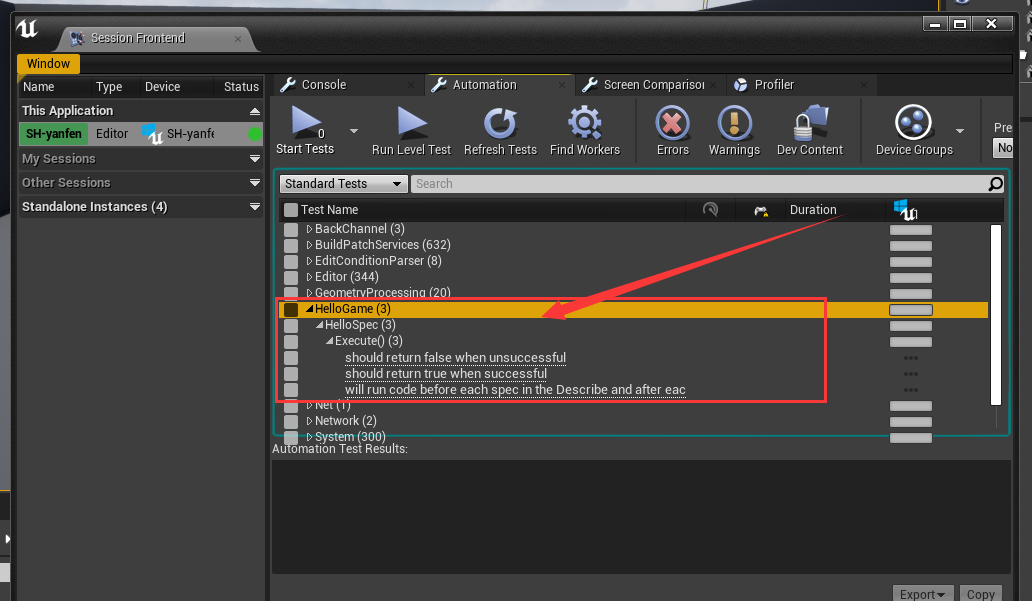
现在我们打开UE4前端,可以看到我们的单元测试

而其中下面三句对应着我们下面的三句代码

除了这个测试其实还要很多类似的测试方式,我们现在逐一介绍:
1.可定义带成员变量的测试
BEGIN_DEFINE_SPEC(HelloSpec, "HelloGame.HelloSpec", EAutomationTestFlags::ProductFilter | EAutomationTestFlags::ApplicationContextMask)
TSharedPtr<FAutoGameManage> CustomClass;
FString RunOrder;
END_DEFINE_SPEC(HelloSpec)
void HelloSpec::Define()
{
	//测试内容
}
在UE4 里面的效果

2.直接定义测试
DEFINE_SPEC(HelloSpec1, "HelloGame.HelloSpec1", EAutomationTestFlags::ProductFilter | EAutomationTestFlags::ApplicationContextMask)
void HelloSpec1::Define()
{
	Describe(TEXT("Execute()"), [this]()
	{
		BeforeEach([this]()
		{

		});

		It(TEXT("should return true when successful"), [this]()
		{
				//测试内容
		});

	});
}
这个实例里面需要加一些内容,如果不加是看不到效果的

3.简洁的测试写法 参数设定为冒烟测试
IMPLEMENT_SIMPLE_AUTOMATION_TEST(HelloSpec2, "HelloGame.HelloSpec2", EAutomationTestFlags::SmokeFilter | EAutomationTestFlags::ApplicationContextMask)
bool HelloSpec2::RunTest(const FString& Parameters)
{
	//这里写测试代码。
	return true;
}
4.NetWork测试
IMPLEMENT_NETWORKED_AUTOMATION_TEST(HelloSpec5, "HelloGame.HelloSpec5", EAutomationTestFlags::PerfFilter | EAutomationTestFlags::ApplicationContextMask,0)
bool HelloSpec5::RunTest(const FString& Parameters)
{
	//这里写测试代码。
	return true;
}
5 除了上面的几个常用的 UE4为我们提供了很多标准的测试方式
